You accidentally overwrite your WordPress files. Your website host goes out of business and you can’t get to your WordPress database containing years of blog posts. These and many other worst case scenarios happen all the time, and having a backup of your WordPress website is the difference between losing hair and breathing a sigh of relief.
Why You Should Back Up Your WordPress Website
This should be pretty obvious, but making a backup of your website isn’t particularly exciting, and often times people fail to do it (and realize the magnitude of their error only when their site is broken and they can’t fix it).
By creating a backup of your WordPress website, you’ll have a snapshot in time of your entire website that you can restore at a moment’s notice. Don’t wait until you accidentally erase files or unintentionally destroy your WordPress database to create a backup. Create your backups today.
What You Need to Back Up
To back up your WordPress website, you’ll need to create a copy of two things:
- Your server files
- Your WordPress database
The server files consist of all the files that are hosted on your server. The database holds all of your posts, pages and other important WordPress data.
Getting Ready to Back Up Your WordPress Website
The first step in backing up your site is to establish a system of doing so. We’ll start by creating a folder named “Website Backup” on your local hard drive. Inside of this folder, create two new folders named “Files” and “Database”.
How to Back Up Your WordPress Server Files
Backing up your WordPress server files is easy. If you’re familiar with how to transfer files using FTP, just log into your server using your favorite FTP program.
Once you’re logged in, create a folder inside of your “Files” backup folder with the current date. In your FTP program, navigate to the root folder of your WordPress installation. Now, simply download everything on the server into your date-stamped backup folder.
Now you’ve got a copy of all of your server files on your local drive, and can move on to backing up your database.
How to Back Up Your WordPress Database
There are two ways (and probably more, if you search WordPress plugins) to back up your WordPress database. One way is to navigate to Tools -> Export in your WordPress admin and export all of your posts, pages, categories, etc. I prefer to have a backup of the entire database, however, and do this via my hosting admin.
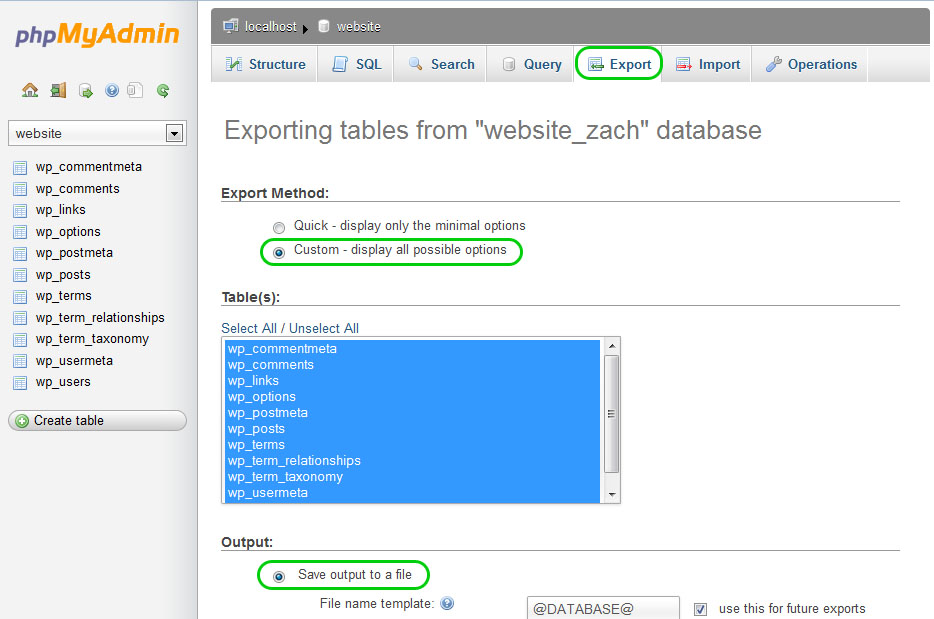
To backup your entire WordPress database, log in to your hosting control panel (cPanel). Find the link to PHPMyAdmin and click it. You’re now viewing an interface that lets you modify (and export) the database with all of your WordPress data.
In PHPMyAdmin, select the database containing your WordPress files (this in most cases is the database that starts with wp_). Now, click the Export tab atop the page. Select the Custom export option, make sure all tables are selected, and select the Save output to a file checkbox.

Finally, scroll down to the bottom of the page and click Go. Save this file in your “Database” file folder on your hard drive, and name it systematically with “yourwebsitename_date.sql”.
Once you’ve saved this file, you now have a moment in time snapshot of your entire WordPress website, files and database, and can use these to restore your entire site should something go wrong. Breathe a sigh of relief.
Why You Shouldn’t Overwrite Backup Files
In working with my website clients, I’ve noticed that a lot of people keep only one backup of their website, and overwrite the files or database as they update. This can be a real problem, and here’s why.
If your most recent backup has an error of some sort, it will destroy the previous backup it has overwritten. Also, sometimes we make mistakes in our coding along the way, and only later realize that we need to restore to the version of our website that existed before we made the error.
It takes up a bit more hard drive space, but you give yourself the most security and flexibility if you create “time capsule” backups of your website and save each backup anew in its own date-stamped folder.


 Zachary Coyne is a freelance website designer and developer in Tucson, Arizona. Zach has been designing, developing, fixing and updating websites for the better part of a decade. He enjoys helping people learn how to fix and update their websites, and offers one on one